How to setup a dual boot from ubuntu … without a proper external device
That’s it, since last Thursday we are locked down again in France. I was a little short on time to adapt, so when I prepared myself to this new era, I took my old Linux laptop with me and a USB key to set a dual boot. Well, it could have worked, except said USB key was dead…

So here is how you can deal with such a situation.
1. Download Windows installer
Just go there : https://www.microsoft.com/en-us/software-download/windows10ISO
Select an edition and your favorite language, then hit Confirm.
The next page will grant you the choice between 32-bit and 64-bit download. Be sure to use the FAQ if you’re not sure of which one to choose. After clicking either of these, the download should begin.
2. Make some room for windows
First, you will have to open disks or gparted. An an illustration, I will use disks installed by default on Ubuntu.
Start by downsizing your current system partition.

Reduce it by as much size as you would like to have for your Windows OS then hit Resize.

You now have a new partition labelled “Free Space”, select it and add a new Partition with the +button.

You will now allocate this free space minus 8Gb to your new system. Use the following field to achieve this.

You can then hit “Next” and select a Windows partition Type.

You now can reproduce the last step for the 8Gb fee space left;
Select this partition, click on the + and create a new Windows partition Type with all the space left.
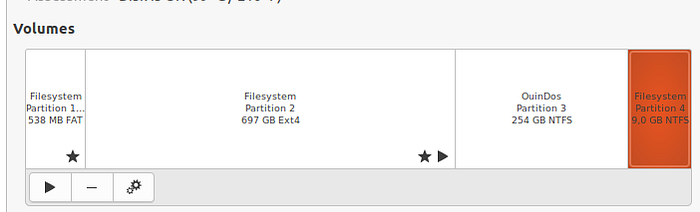
Finish the process by mounting this last partition by selecting it and clicking on the bottom-left triangle button.
3. Install boot-repair
This software is a little gem and might help in case of boot issues. Here, we will use it to ensure that our GRUB is up and running. We will follow this process https://help.ubuntu.com/community/Boot-Repair
Open a new terminal and execute the following commands
sudo add-apt-repository ppa:yannubuntu/boot-repair
sudo apt-get update
sudo apt-get install -y boot-repair && boot-repair
Use the Recommended repair button and follow the process until the program closes.
4. Creating our new Windows installation device
Our Windows ISO should be downloaded by now. Locate the file on your disk and right-click on it. You should have an “Open With Disk Image Mounter” option in the contextual menu : select it.
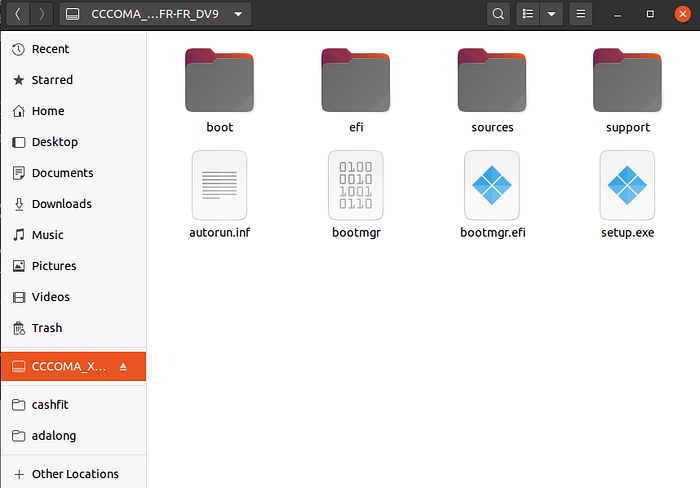
Select all those files and copy them on your freshly mounted 8Gb partition. Once this is done, we can now reboot !
5. BIOS Tweaking
When you reboot, enter in BIOS setup mode (mashing F1, F2, F10 or DEL following your type of device).

When you are in your BIOS, find and disable the FastBoot option, if you are lucky enough to have a dedicated boot options section, change the order of boot to force boot from your 8Gb partition and jump to section 7. Otherwise, we will have to setup boot using GRUB, save your changes (usually F10) and keep ready for the next step.
6. Alter your booting sequence using GRUB
Reboot your computer and mash ESC key until the GRUB loader shows :

Press C to access command-line mode. Tab key will be your best friend for the 5 next minutes. Start typing :
set root=(hdNow press Tab. If you have only one Physical drive, it should now autocomplete to :
set root=(hd0,If it’s not the case, you will have to try all options you see listed (hd0, hd1 …) and process with next step until you find the desired partition.
Let’s hit Tab again ! Options should now be listed, spot the 8Gb partition (It should be the last one. In my case the (hd0,gpt3) will be what I am looking for. Complete the line and hit enter !
set root=(hd0,gpt3)Now, we will specify which file will be used to boot from our install partition. Type in chainloader and keep using Tab to autocomplete your path.
chainloader (hd0,gpt3)/Pressing Tab twice will list the available folders and files, you should have an efi/ folder among them. If it’not the case, you probably have the wrong disk selected (hd0, XXX) and should try to find the correct label to access the 8Gb partition. Here is my final path, checked with autocomplete.
chainloader (hd0,gpt3)/efi/boot/boot64.efiWhen you have completed this line, hit Return then type in the final command to boot in Windows setup mode :
boot7. Setup Windows
Follow the installation steps until you get one this screen:

You should now be able to select the partition where you want to install Windows (in my case, it is the Second from the top containing 263Gb) and hit Next. If the Next button is disable, Hit the delete button with the partition still selected. Your partition should now be labelled as “Unallocated Space”, select it and hit Next. Your installation should now proceed until Windows boots normally. We are still not done yet because Windows has a bad habit of considering he is alone, we will see how to fix this in the next steps.
8. Fixing the dual boot mode
Your Windows boot sessions has now started, you might want to wait for system updates to complete. Once you are done with setup / updates, reboot your computer straight to BIOS and disable FastBoot once more. Save your changes and reboot mashing ESC to enter GRUB mode.

You are now back to your Ubuntu session, everything should be as before. We just have a little cleaning to do :
Open a terminal and launch boot-repair as previously. We will select the Recommended Repair again to fix our dual boot state.
We just have to remove our 8Gb install partition as it is now useless. Open Disks, select the 8Gb partition and hit the minus button.


We will now select our Windows partition to occupy the remaining space. Select the Resize option and reduce the Free Space Following to 0.

9. Enjoy !
Congratulations, you are now the proud owner of a fully configured functional dual-boot system. You are now free to work with either your Linux tools or your Windows Tools.
I hope it might be useful if you ever have to deal with this kind of situation 𝨾☺